julianowahab
Jul 23, 2024
How to Create a Virtual Exhibition in 10 Minutes
The 2022 World Cup final was arguably the most entertaining match of all time, and there was no feeling quite like being physically present among 89,000 fans. But what's even crazier is that 1.5 billion people watched it on television, making the final the most-watched event in history. I might argue the biggest contribution to the sport was tech—creating cultural icons and unforgettable moments in our lives.
Exhibitions behave the same way. If you are only building for the physical world, you miss out on people taking pride in a great exhibition in their city, the potential to archive the exhibition and rewatch it, heck, even re-experience it in VR. The potential to not only grow the reputation of an institution and reach global audiences but also to inspire and educate others who might not have had physical access to visit their favourite artworks or view their favourite brands and items.
Why Haven't Virtual Exhibitions Gone Mainstream?
Unlike a broadcast on TV, virtual exhibitions go beyond the 2D realm. It's not enough to show a video of an exhibition since it is a mostly static atmosphere. Experiencing an exhibition stimulates all senses, and unfortunately, I believe what we currently have feels boring.
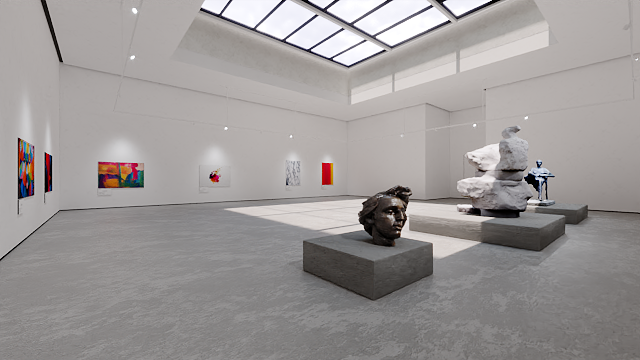
The true potential of virtual exhibitions is to be in 3D, leveraging technologies like AR to introduce dynamic interactions with a user. Traditionally, digital museums tend to look gimmicky and misunderstood. I wrote a separate article on what is and what's not a virtual exhibition; you'd be surprised how even the biggest players in the space mistake it to be.
Creating these AR/VR and 3D experiences for a virtual exhibition has traditionally been extremely costly and time-consuming, sometimes taking anywhere from 2-9 weeks. If you've ever tried learning to use 3D software, you would comprehend the torturous pain of understanding polygons, shadows, UV mapping, ... However, a well-crafted virtual exhibition can reach enthusiasts worldwide, attract potential buyers, and drive traffic to your physical space.
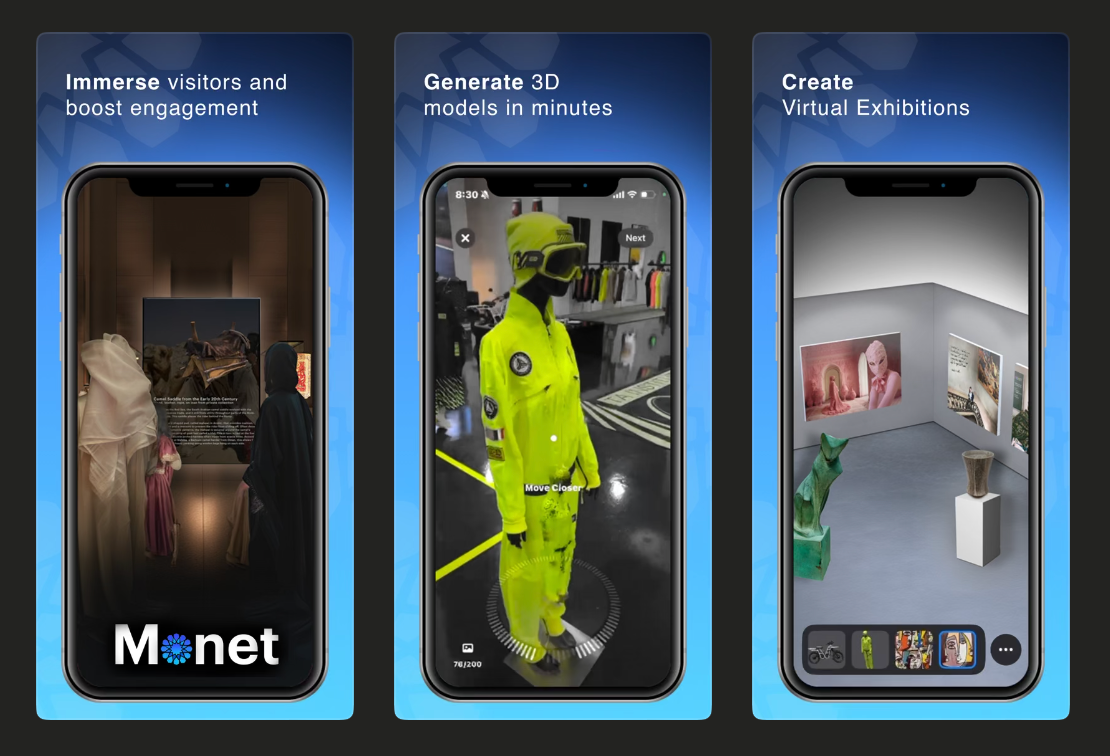
At Monet, we make it possible, so you will never need to learn to use 3D software. In 3-6 minutes, you can turn any object into 3D and AR using only your phone and curate a space with simple drag-and-drop movements on your screen.
Step by Step guide to creating a virtual space
You only need 2 things:
- iPhone 11 or above (we are working on making it available on Android very soon)
- Objects that are not reflective like glass or very shiny metal
For a custom space, reach out to us directly, and we will be happy to help you.
Step 1: Download the Monet App
First, download the Monet app on your iPhone. This will be your primary tool for creating and managing your virtual exhibition. After creating your exhibition you will be able to integrate the 3D objects and spaces you created directly onto your website.
Step 2: Create a Space
Within the app, navigate to Vgallery and click the plus "+" icon on the top right to create a new space. This will be the virtual space where your work will be displayed. Choose a name to identify the space, and by the way you can create as many as you like.
Do you have a specific feature you are looking for, for your exhibition, we can make it happen so feel free to reach out to us on social media or message us directly.
Step 3: Digitize Your Objects
If you have 3D files of your objects already taken, feel free to add them directly into the space. If you are experiencing an error, please make sure the file and the dimensions of the object is not too large and the object is optimized.
If you don't have a 3D file, that's perfectly fine! On the Monet app you can scan your object and transcend from physical to digital. This isn’t just about snapping a photo; it’s about capturing every nuance for the highest quality output. Don’t worry if it takes you 2-3 tries at first. Once you figured it out you'll be creating high quality scans.
If the object you scanned did not turned out well, don't worry that's normal! If the lighting or the object contains a flat color or reflective surfaces it can affect the scan. We are continuasly working to improve this step for you not to need object clean up.
For object clean up, reach out to us directly, and we will be happy to help you.
We created a guide for you to achieve the highest quality 3D scans, and dives in more detail to make you an expert scanner in only 4min. I promise you it's not hard.
Step 4: Designing Your Virtual Space
Now that your work is digitized, it’s time to design the space where your work will live. This step is all about creating an immersive environment that complements your work and enhances the viewer’s experience.
Step 5: Publishing and Sharing
Your exhibition looks fantastic! To publish it's as easy as clicking save and now it’s time to share it with the world. Sharing your virtual exhibition is crucial for drawing in viewers and creating unforgettable memories for your audience. To start sharing, you will need a Monet Premium account. For more details on the benefits, visit our pricing page.
You can also check out the best strategies we found to market your exhibition.
Ready to Take Your Exhibition to the Next Level?
Create your first virtual exhibition on the Monet app—it's free—and create hyper-realistic 3D assets of your physical objects to share with the world.
Stay Creative.
Stay Creative.
Share the creativity

julianowahab
Through Monet, I'm committed to building a platform that empowers artists and art lovers alike, fostering an inclusive community that celebrates creativity in all its forms. Join Monet and engage with the art world in new and exciting ways. If you have questions or want to chat, message me on Instagram @julianowahab.