How to Light Your Booth So It Looks Like the Render

Booth lighting starts from the hall's own light. A big Dubai hall runs at 296 lux, so a hero item needs about ten times that, 2,960 lux. Set the render to the hall's light first. Light the hero from the front header, keep the wall behind it dark, draw every head and focus with the hall lights at show level.
In the render, the ship model glows in a pool of light, and the hall around it is black. The client signed off on that picture.
Then you walk into Hall 6 at nine on opening morning. The roof lights are on, bright and even. The model on its plinth looks as grey as the carpet.
Nothing broke. The render was lit in a black hall, and halls are not black. The client asks why it looks different, and the doors open in an hour.
You want the stand to look like the picture the client signed. Two things stand in the way. The hall puts light on everything, and you can't switch it off. And a render that starts from black hides that until opening day. So plan the booth lighting from the hall's own number. Put light only where you want eyes to go. Then draw every head, so the stand is built the way you lit it.
Take one stand. It is made up, at a real venue. It is a 6 by 5 m space only stand. It sits on a corner of Hall 6 at a big Dubai venue. Its hero is a 1.2 m scale model of a heavy lift ship. The hall's numbers and rules come from the venue's own papers. The show's dates are samples.
What light does the hall already give you?
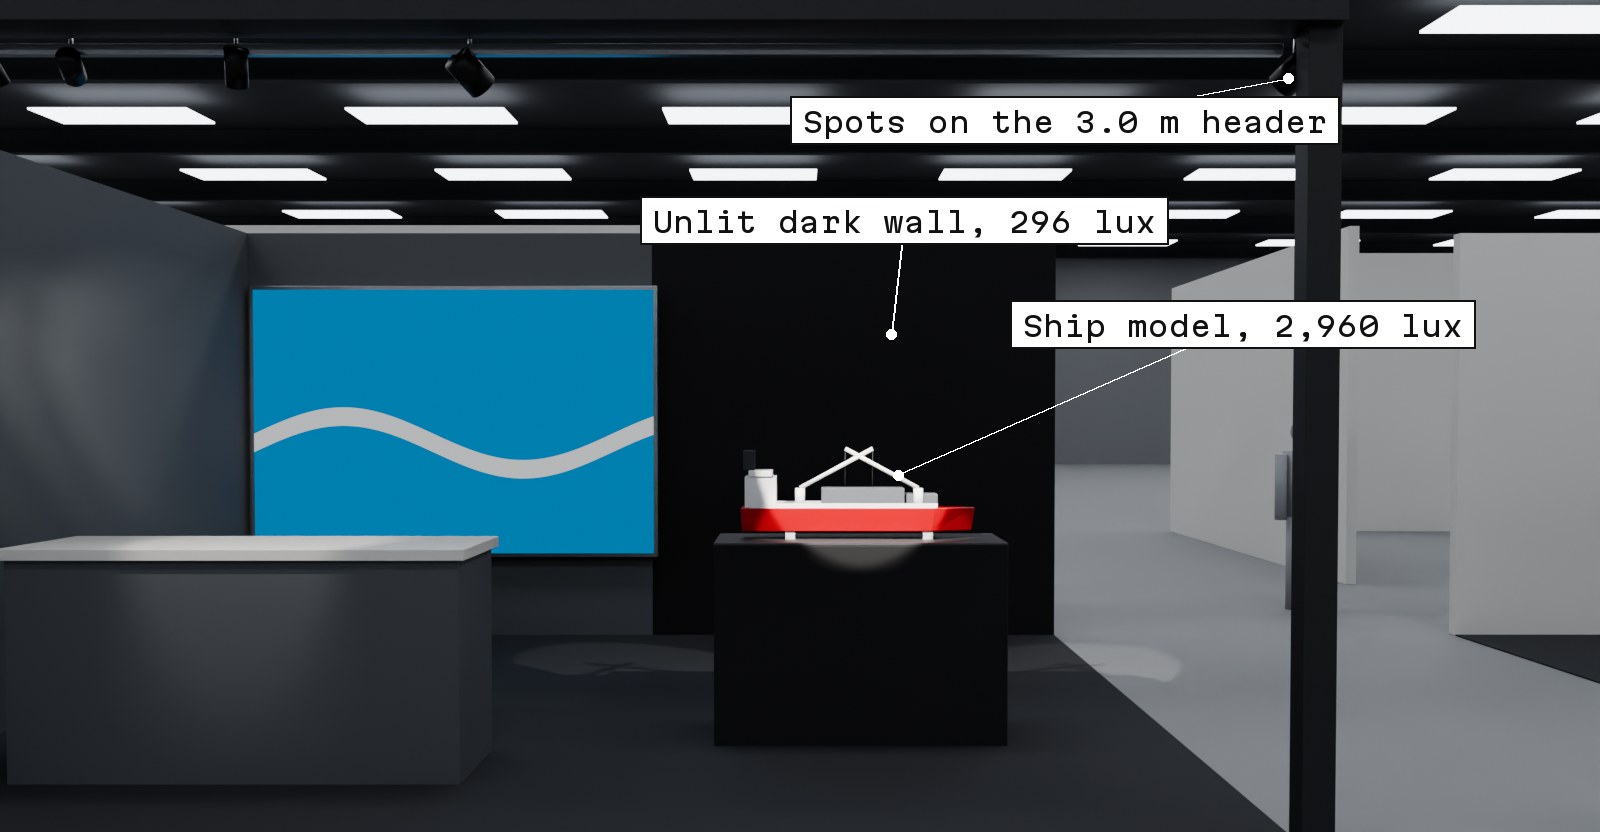
Corner stand in a bright exhibition hall with the red ship model lit to 2,960 lux in front of an unlit dark wall
The venue's hall sheet lists Hall 6 at 296 lux, under a roof 7.50 m high. Lux is how much light lands on a surface. Halls 1 to 8 run from 244 to 467 lux.
That number changes the job. A dark room starts at zero, which is the job in mood lighting for a dark room. Your stand starts at 296. Every lux you add sits on top of the hall's.
The sheet doesn't say where 296 was measured, on the floor or on a wall. So ask the venue, and check with a light meter on build day.
Then fix the render before the client sees it. Set its room light to the hall's real level, and only then add your own lights. If the hero still stands out, the design will work on the floor. If it only stands out in a black hall, it won't.
How bright should booth lighting be?
Make one hero about ten times brighter than what is around it. Lighting designers call 10 to 1 strong. At 5 to 1, the eye barely sees a difference. At 2 to 1, it sees none.
So pick one hero, the one thing a visitor must see from the aisle. Here it is the ship model. Light the rest of the stand above the hall, but well below the hero.
Ten times 296 is 2,960 lux. That is the target for the ship model.
Now look behind the hero. The eye compares the model with the wall behind it. Leave that wall unlit, and it stays at the hall's 296 lux. Then the model is ten times its backdrop. Wash that wall to 600 lux so it looks finished, and the model is only 4.9 times as bright. It goes flat again.
So the dark wall is a design choice, not a gap in the plan. Put the hero in front of the darkest surface on the stand. Keep the light box and any lit graphic well away from it.
Where should the hero spots hang?
Hang them on the front header, the beam across the top of the open front. Here it sits at 3.0 m. The model sits on a 1.0 m plinth, 2.0 m back from the front edge.
Use two spots, one on each side of the model, so it gets shape. Pick a beam that just covers the model. On this 1.2 m model, about 3 m away, a 24° beam is about right. A 10° beam lights only part of it. A 36° beam spills onto the wall behind.
Ask your lighting supplier for spots that reach 2,960 lux at that distance. A plain track head won't. Closer is the cheap fix, not more watts. A spot on the header is closer than one on a truss high above. It also keeps the light on your own stand.
Aim each beam so the light that passes the model lands on the floor, not on the wall behind. Otherwise the backdrop lifts and the contrast drops.
The layers of booth lighting, with the numbers
A render shows the glow. It doesn't show which head makes it. So the light plan goes on your drawings as one more sheet. Give each head its place, its aim and what it must reach. Here is the list for the Hall 6 stand.
| Light | Where it sits | Its job | Target |
|---|---|---|---|
| Two 24° spots | Front header, 3.0 m up, one each side of the model | The ship model | 2,960 lux |
| Six track heads | Front header | The counter and the left side wall | About 600 lux |
| Nothing | None | The dark wall behind the model | The hall's 296 lux |
| Light box, 3.0 by 2.0 m | Back wall, left half | The one graphic read from the aisle | Glows by itself |
A light box is a fabric print over a frame lit from behind. It makes its own light, so it holds its colour under full roof lights. Use it for the one graphic that must read from far away.
Aim every head down and in, from the front edge toward the back. Then each beam lands on your stand, and the bright face of each lamp turns away from the aisle. A light pointed at the aisle dazzles the people you want to stop.
Put the header, its posts and each height on the elevation drawing. Open sides limit where header posts can go. Most show manuals cap how much of each open side you may wall in. Find your show's share before you place the posts.
Two venue rules shape the plan. Hot lights must be covered so a hand can't touch them, or sit out of reach and away from anything that can burn. Ask the venue's health and safety team for the current rules. And only the venue rigs from the roof. Your stand itself must stand on the floor. A hung truss for lights needs the venue's approval and two weeks' notice before your first build day. How a hung rig is drawn is in what a rigging plot is.
What is the order of work, and what does a late change cost?
Focus means aiming each head, locking it and checking the result. Do it last, with the hall lights at show level. Hall lights may not run at full during build, so ask the venue what level they run at on the last build night.
Only the venue rules below are fixed. The other dates are samples.
- Six weeks before, a sample. Your drawings, with every elevation, go to the organiser's plan checkers. The venue then issues its permit to build.
- Two weeks before your first build day, a venue rule. Notice of any truss or hoist goes to the venue, with a dimensioned plan of every point.
- Build day two. Power goes on only after the venue's electrician inspects the stand. Any change after that is shown to the venue and tested again. So focus once power is live, inside the build hours.
- Opening morning. Check every head under show light, before the doors open.
Move a header after the permit, and it costs. Every space only stand needs the venue's permit to build. For a stand on one floor the fee is AED 500. A change after the permit is a new request with a new fee, and fees are not refunded. So fix the header and its posts before the drawings go in.
How do colour and daylight change the plan?
A brand red can look dull under the wrong lamp. The colour rendering index, Ra, scores how true colours look, from eight test colours. Strong red is not one of them. It has its own score, R9. An LED can score 80 on Ra and 0 on R9. So ask for Ra 90 or more, and check R9 on the datasheet before the order goes in. Test the brand colour under your lamps and the hall's, as in how light changes a brand color.
Pick one colour temperature for every head, so warm and cool don't mix. The hall sheet gives none for its own light, so ask the venue.
Daylight changes the numbers. The hall sheet doesn't say whether Hall 6 has any. Some halls do. There, design for the brightest hour. A hero that wins at noon wins all day.
A closed demo room inside the stand is the other case. It starts at zero, so light it like a room, not a stand.
Back to opening morning
Go back to nine o'clock in Hall 6. This time the plan started at 296 lux. Two 24° spots on the 3.0 m header put 2,960 lux on the ship model. The dark wall behind it stays at the hall's 296, so the model is ten times its backdrop. The light box glows on the other half of the back wall. Every head points down and in. The client walks up the aisle and sees the stand they signed.
Lay out the stand in Monet and use the lighting presets to see it in the 3D view, then make renders for the client. Give each header height on drafting sheets with dimensions, and mark every head, its aim and its circuit with 2D markup. Export the plan as PDF or DXF. Get started for free on Monet.