
Why Your Stand Wall Is Taller Than You Drew It

An elevation drawing gives every height of your stand. Write each one from the hall floor, as AFF, not from the top of your raised floor. On a 100 mm platform, a 4.00 m wall tops out at 4.10 m. At a venue with a 4.00 m line, that means approved plans. Stand the wall on the hall floor, and it stays at 4.00 m.
Your stand builder's project manager calls from the hall. It is the first build day. The back wall of your stand is up, and the laser reads 4.10 m to the top. Every sheet you sent says 4.00 m.
Nobody drew it wrong. Your elevation drawing measured the wall from the top of the 100 mm raised floor. The hall measures from its own floor. So the wall the client signed is 100 mm over the line. And at this venue, a stand over 4.00 m needed approved plans six weeks ago.
You want the stand built the way the client signed it. The fix is cheap if you see it early. Draw every height from the hall floor. Then the 100 mm shows up at concept stage, while the wall can still move.
Take one stand. It is made up, on a real German venue's 2026 rules. Stand C14 is an 8 by 5 m corner stand, 40 m², in Hall 4.0. It has a 100 mm raised floor, a 2.40 m counter and a meeting room of 3.00 by 2.50 m. The client has signed the render. Now draw what the build needs.
Where do you measure every height from?
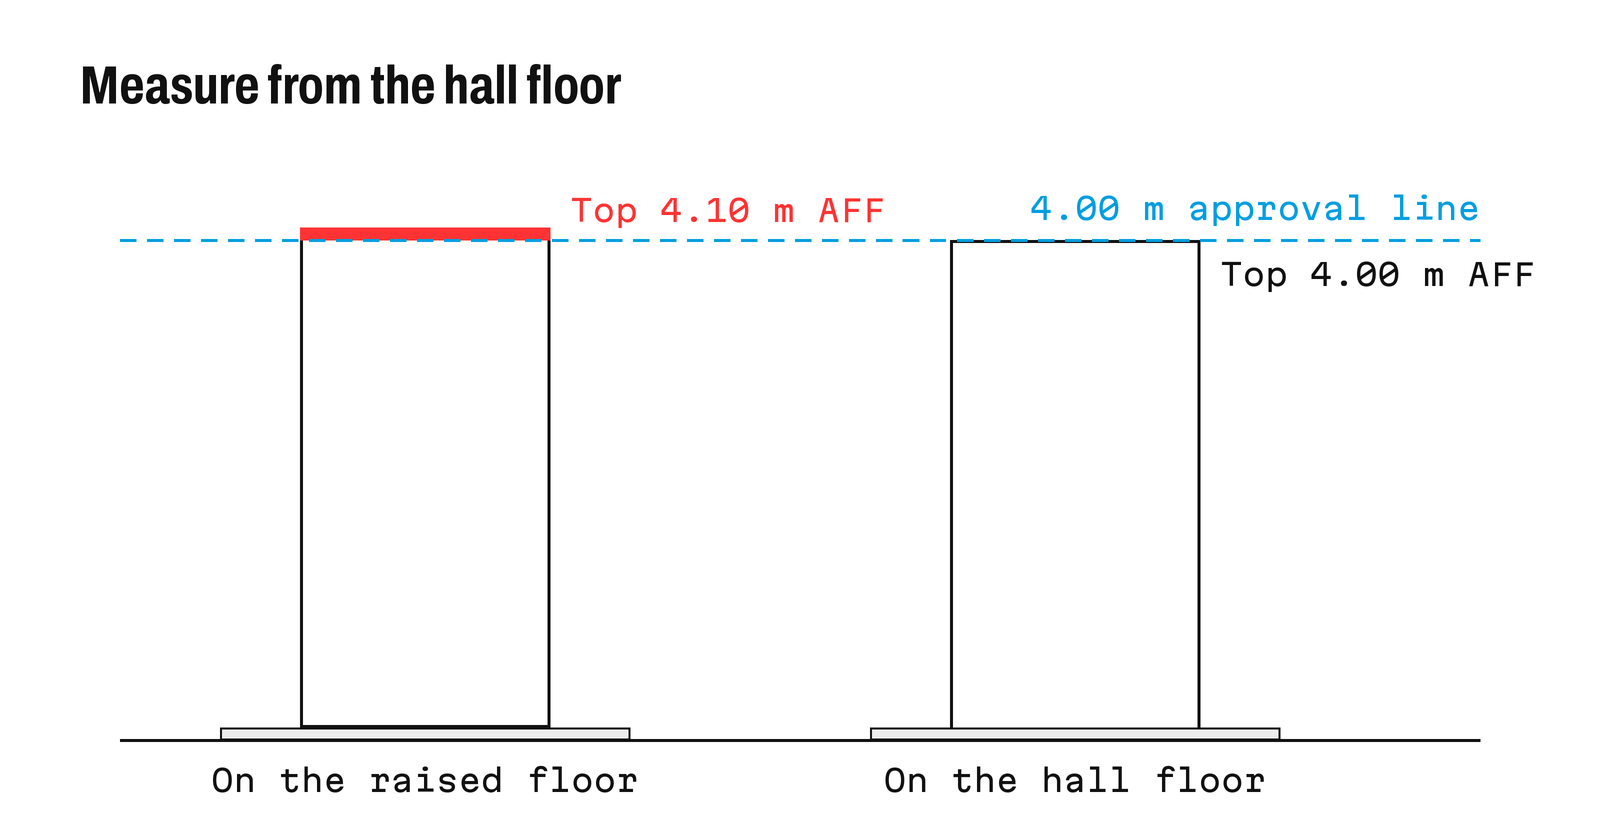
Two 4.00 m stand walls side by side, the one on the raised floor topping out at 4.10 m above the hall floor, over the 4.00 m approval line
Every elevation needs a datum, the line all heights start from. Use the finished hall floor. Write AFF after each height, short for above finished floor. The rules don't say where to measure from, so the safe reading is the hall floor.
That changes how you write every height on a raised stand. The C14 counter stands 1.10 m above the platform. Add the 100 mm floor, and its top is 1.20 m AFF. Write 1.20 m AFF. Your stand builder, the graphics printer and the venue's checker all measure from the hall floor. Give them the number they will read with a tape.
Here is the trap. You model the back wall 4.00 m tall and set it on the platform. On your screen, it is a 4.00 m wall. On the hall floor, its top is 4.10 m AFF. That 100 mm is the whole story of the phone call.
Which heights decide if your stand needs approval?
At this venue, the heights on your elevations decide if you send plans at all. Section 4.2 of its 2026 Technical Guidelines sets the triggers.
- A stand of one storey, 100 m² or less, with no part over 4.00 m, sends no plans.
- Any part over 4.00 m makes it a special construction. So does a raised floor over 0.20 m, a closed ceiling, glass or parts that move.
- A special construction sends plans and waits for a stamp. Building may not start before the stamp.
- Its 2026 price list charges €499 to check walls over 4.00 m.
C14 is 40 m², one storey, with a 0.10 m floor. Only the back wall can trip it. On the platform, it tops out at 4.10 m AFF. That means plans, a check and a deadline.
Now make the design call, while it is cheap. Stand the back wall on the hall floor, just behind the platform edge. The wall is still 4.00 m tall. Its top is now 4.00 m AFF. No plans, no €499, no deadline. The client sees the same stand.
Or keep the taller wall on purpose. The hall has its own cap. The venue's height sheet allows 7.00 m in Hall 4.0 for stands over 31 m², at its own fairs. A guest fair sets its own. So 4.10 m is legal. It just needs approval. That is why each C14 sheet carries two lines, the 4.00 m approval line and the 7.00 m hall cap.
If you go over, count the date. Plans are due six weeks before set up starts. Set up starts five calendar days before the fair opens. Our fair opens on Tuesday 9 March 2027, so set up starts on 4 March. Six weeks before that is 21 January. A real fair can set an earlier date, so check its own page.
How many elevations does a stand need?
One for every face someone will see, build or print. C14 is open on its 8 m front and its 5 m right side. It still needs four outside views. Two face aisles. Two face the stands next door.
The backs that face your neighbours are the ones people skip. The venue checks them. Its guidelines want the back of a wall toward a neighbour smooth and white from 2.50 m up. C14's back wall rises from 2.50 m to 4.00 m above that line. That is a band of plain white back 1.50 m tall. Draw it, and tell the client that face carries no graphics.
You can skip the white back another way. The guidelines let the wall sit 1.00 m in from the border. On C14 that costs 7.95 m² of floor, about a fifth of the stand. So C14 keeps the wall on the line and paints the back white.
Why 7.95 m and not 8.00 m? For its own fairs, the venue supplies 2.50 m partition walls free, if you order them at least 21 days before the fair. For our fair, that is by 16 February. And it takes 5 cm off the confirmed width, to give the clear space between partition faces. So draw C14's front and back at 7.95 m clear. A wall drawn at 8.00 m won't fit between the partitions.
Then the inside walls. C14's meeting room has four. Each gets an interior elevation, the same flat view seen from inside the room. It places the door, the shelf, the screen and each socket at its height AFF. The door is at least 0.90 m clear and opens outward, toward the way out. Sliding doors are not allowed on the way out.
So C14 has eight views. They fit on one sheet at 1 to 50, with a key plan. That is a small plan with an arrow for each view.
An island stand has no neighbour backs. All four faces are aisle faces. A two storey stand always needs approval, and a much dearer check.
What goes on each elevation drawing?
Put on each sheet what your stand builder, the printer and the checker need, so nobody calls you.
- Every height AFF, such as wall tops, the counter top, screen edges, the light rail and the top point.
- The 4.00 m approval line and the 7.00 m hall cap, right across the sheet.
- On each face toward a neighbour, the 2.50 m line, marked smooth white above.
- The raised floor at 100 mm, with its edge and its ramp.
- Each graphic with its size, and each logo set out from the neighbour borders.
- The open length of each aisle face, in metres and as a share.
- Each door with its clear width and the way it swings.
- The key plan arrow and the name of the face.
- A title block with the scale, the date and the revision letter.
Do the open side sum on the sheet. The guidelines aim for a front that is 70% open, and ban long closed walls on an aisle. C14's right side is 5.00 m. A 2.00 m screen wall stands at its back end, so 3.00 m is open. That is 60%, short of the aim. Cut the screen wall to 1.50 m, and you reach 70%.
Logos have a line too. The guidelines keep logos 1.00 m from a neighbour's border. So C14's logo starts 1.00 m in from the C13 line.
The raised floor needs a ramp. Ramps on the way out may rise 6% at most. So a ramp up 100 mm needs about 1.70 m. Draw it inside the stand line. Take the floor past 0.20 m, and its open edge needs a railing at least 1.10 m high.
Name each view by where the viewer stands, such as seen from the front aisle or seen from C13. Put the arrow on the key plan. Builders in Europe and the US place views in opposite ways, so one can read the other's left side backward. An arrow means nobody has to guess.
In the US, many shows follow shared line of sight rules. A linear booth may have a back wall of 8 ft, or 2.44 m, but only in the rear half. The front half stops at 4 ft, or 1.22 m. So the limit line on a side elevation steps down halfway. Draw the step.
Who reads which sheet, and by when?
One stand gets several sets. Each has its own reader and its own date. The scales for the build and print sets are a habit, not a rule.
| Set | Scale | Who reads it | Due for C14 |
|---|---|---|---|
| Approval, only if a line is crossed | 1 to 100 | The venue's technical team | 21 January 2027 |
| Partition order | Plan only | The venue's exhibitor shop | 16 February 2027 |
| Build | 1 to 50, with 1 to 20 details | Your stand builder's project manager | Its workshop date |
| Graphics | 1 to 20 | The graphics printer | Its file date |
| Electrical layout | 1 to 50 | Your stand builder, for the power order | The fair's order date |
The approval set goes in as one PDF of 10 MB at most. The guidelines ask for plans, sections and perspective views. Neither paper names elevations. Send them anyway, because the checker reads the heights off them.
The most common mistake has a simple cause. The client asks for a bigger counter. You update the render, and not the elevations. Now the render shows a 2.50 m counter, and the sheet still says 2.40 m. Your stand builder builds from the sheet. So issue every change as a new revision letter, with a cloud around what moved.
Before the PDF goes out, check that every size the plan and the elevations share is the same number. Then check each top sits under its line, written AFF. If C14 hangs a sign, its top height must match the rigging plot. The printer reads each panel size from these sheets, and the graphics schedule template lists each panel once. For the rest of a set ready to build, see what makes a drawing production ready.
For a hired stand with fixed wall heights, read what a shell scheme is first. For which faces count as open on other stand types, see peninsula booth vs island booth. For the rest of what the build team asks for, see what your stand builder needs.
Back on the first build day
Go back to the phone call. This time you drew every height from the hall floor. You saw the 4.10 m on your own sheet in January. You stood the wall on the hall floor, behind the platform edge. The laser reads 4.00 m. The sheet says 4.00 m AFF. The back is white from 2.50 m, and the wall fits the 7.95 m between partitions. Your stand builder's project manager doesn't call. The stand goes up the way the client signed it.
Bring the venue plan into Monet and lay out the stand to scale in the real hall. Drafting sheets give you iso, left and right views with dimensions. Mark each height on the 2D plan, pin comments where a choice is open, and export DWG, DXF or PDF for your stand builder. Get started for free on Monet.