
How to Make a Graphics Schedule for Your Stand

A graphics schedule ties every print file to a code on the elevation drawings, with its product, size, fixing, fitter and revision. Fill in the template for your shell scheme kit before the order date, with the poles drawn first, so every panel lands at the right size and the stand matches the render the client signed.
The client signed one picture across the back wall. On build up day, a join runs straight through the logo.
Nobody printed it wrong. Your render showed one smooth wall, 5 m wide. The shell scheme gives you five panels, with a join every 992 mm. The render had no joins in it.
You want the stand the client signed. The kit stands in the way, and so does the order date. Get the panel sizes wrong, and the stand comes up short in front of the client. Then it is back and forth on the stand, the night before the doors open.
A graphics schedule closes that gap. And you check every panel against the kit before anything is ordered.
Take one stand. The show is made up. It is an engineering show at a big Birmingham venue, opening on Tuesday 15 June 2027. The stand is a corner stand of 5 by 3 m. The 5 m front and one 3 m side face aisles. The back wall carries one wide picture. The side wall carries a screen and two shelves. A printed counter stands at the front corner.
What is a graphics schedule?
A graphics schedule is one table that lists every printed item on a stand. Each line is one item, coded to your elevation drawings. It gives the code, the sheet it is on, where it goes and the product. It gives the print size, who fits it, the file, the revision and the status.
Two people work from it, and they read different columns. The printer reads the code, the product, the size and the file. It prints and packs each panel with its code on the back. The stand fitters read the code, the sheet, the place and the status. They stand at the wall with the drawing and hang A3 where A3 is drawn.
So the codes must match both ways. A code on the drawing but not in the schedule never gets printed. A code in the schedule but not on the drawing has no place to go. Check both ways before you order.
Why doesn't the shell stand look like the render?
A render draws a wall. The shell is a frame of panels. What is a shell scheme explains the kit. Here is what it does to your picture.
The official shell contractor's own brochure for its kit gives the sizes. It is a 2015 file, still on its ordering site. So check each size against the template for your own show.
- The poles stand 992 mm apart, centre to centre. Each one is 45.5 mm wide.
- A wall panel is 938 by 2,354 mm. You see 923 by 2,340 mm of it.
- The walls are 2.5 m tall, with 2,430 mm clear under the ceiling beams.
- The fascia over the open sides is 300 mm deep. It carries the name panel.
- No open side may run more than 4 m without an extra support.
Each line changes your art. You see less than the whole panel, so the edge of each print hides in the frame. A word set tight to the edge loses its last letter. The joins fall every 992 mm, so a face or a logo on a join is cut in two. And the front is 5 m, which is over the 4 m span. So an extra post stands somewhere along it, and the render never showed it.
A render is not enough to print from. The printer needs sizes, and the fitters need places. Neither one is in the picture.
How do you count the panels from the drawings?
Draw the poles on each elevation first, at 992 mm centres. The elevation drawing is the flat view of each wall. Once the poles are on it, each gap between two poles is one panel. You can count them with a finger.
Here the back wall is 5 m, so it has 5 sections, or 5 × 992 = 4,960 mm. The closed side is 3 m, so it has 3 sections, or 2,976 mm. That makes 8 wall panels. The brochure's own corner stand of 4 by 4 m also has 8 panels, so the count checks out.
Now give each wall a letter, and number its panels from left to right as you face it. The back wall is A, so A1 to A5, on sheet E1. The side wall is B, so B1 to B3, on sheet E2. The counter is C1. The name panels are N1 on the front and N2 on the open side. Those three go on the plan, sheet P1. Write each code big on its panel, so the fitters can read it on a phone.
Then place the art on the poles, not on the render. Keep faces, logos and small type off every join. Set a long headline so the joins fall between its words. Let big shapes and flat colour cross the joins, since a hairline hides well there.
Last, ask the official contractor where the extra front post goes, and draw it on the plan. It decides where the counter and any floor sign can stand. If that support lands right behind the counter on build up day, the look the client signed is gone.
Which product goes on which wall, and who fits it?
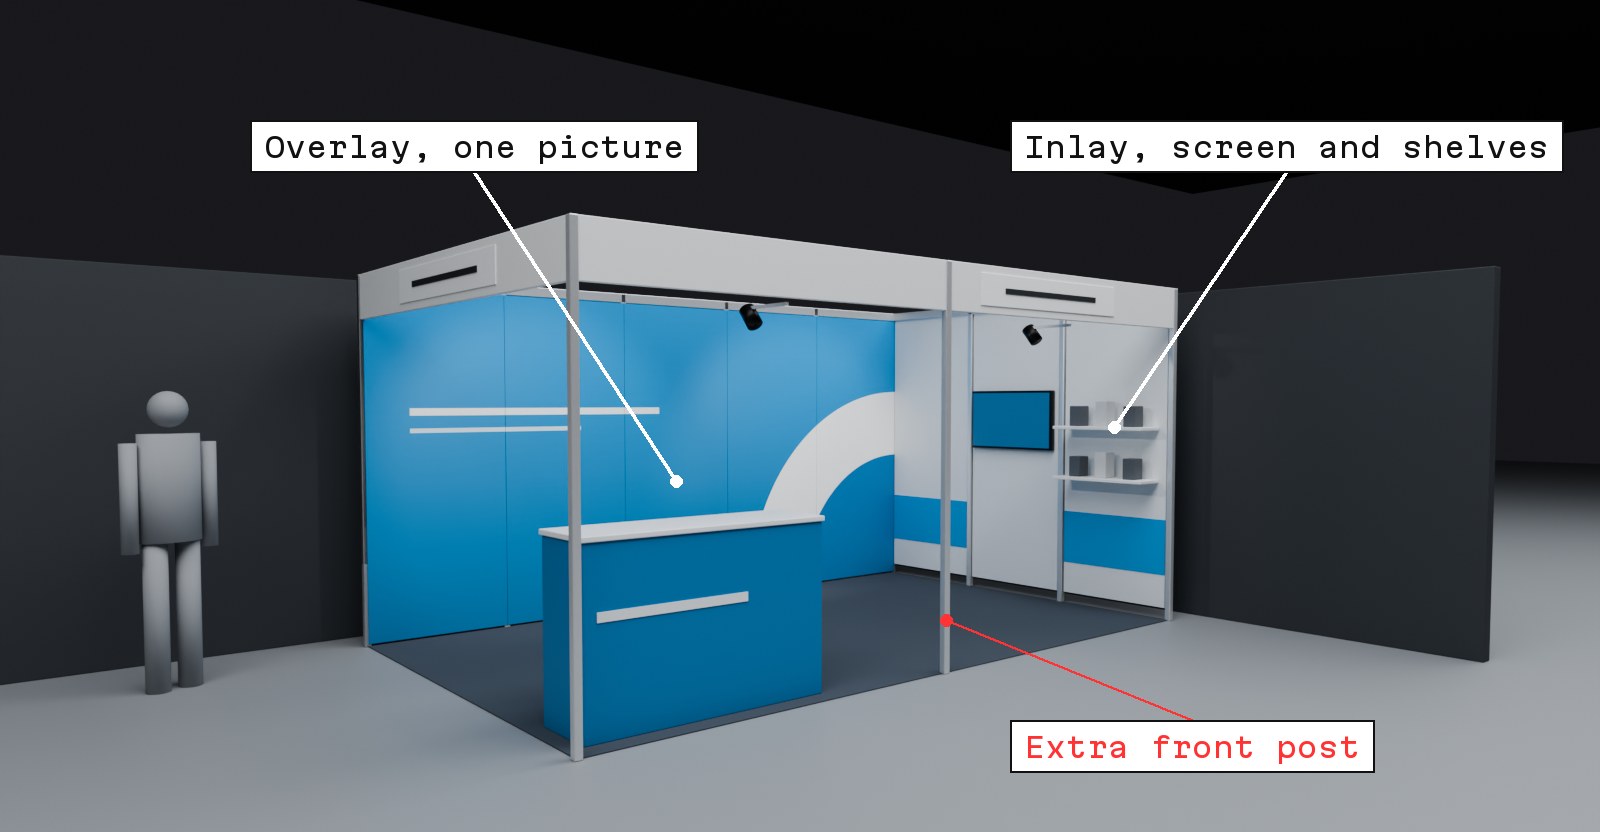
The 5 by 3 m corner shell stand from the aisle, with one picture on overlay panels across the back wall, a screen and shelves on inlay panels on the side wall, and the extra front post marked in red
The product sets how much of your picture shows. The official contractor's 2025 graphics brochure offers three.
| Product | How it sits | What it does to your art | Use it for |
|---|---|---|---|
| Overlay | Clipped over the frame | Covers the poles. Panels meet in hairline joins | One big picture, with nothing hung on it |
| Inlay | Inside the frame | The 45.5 mm poles show between panels | Screens, shelves and a store room door |
| Rollable inlay | Inside the frame, on magnetic tape | Rolls up for the next show, with new tape each time | Walls you reuse at the same stand size |
So use one rule. A wall with one picture and nothing on it gets overlay. A wall with a screen or shelves gets inlay. Reuse walls only when the next stand is the same size, and check that show's kit first.
Then pick who prints, because that decides who owns a size mistake. If the official contractor prints, it sizes to its own frame and gives you its template. Its brochure says it guarantees to install on time. Still ask it in writing to replace any panel that does not fit. If your own printer prints, your team fits, and every size error is yours. So if no one on your team has fitted this kit before, let the contractor print the walls. Use your own printer for loose items.
The graphics schedule template, filled in
Copy the columns and fill in your own lines. The prices are made up samples, before VAT. Use the rates on your own show's order form.
| Code | Sheet | Where | Product | Print size | Fitted by | Sample price | File | Status |
|---|---|---|---|---|---|---|---|---|
| A1 | E1 | Back wall, far left | Overlay | Contractor's template | Contractor | £300 | SHOW27_A1_RevB.pdf | Proof sent |
| A2 | E1 | Back wall, second | Overlay | Contractor's template | Contractor | £300 | SHOW27_A2_RevB.pdf | Proof sent |
| A3 | E1 | Back wall, middle | Overlay | Contractor's template | Contractor | £300 | SHOW27_A3_RevC.pdf | One change asked |
| A4 | E1 | Back wall, fourth | Overlay | Contractor's template | Contractor | £300 | SHOW27_A4_RevB.pdf | Proof sent |
| A5 | E1 | Back wall, far right | Overlay | Contractor's template | Contractor | £300 | SHOW27_A5_RevB.pdf | Proof sent |
| B1 | E2 | Side wall, back | Inlay | Template, seen 923 × 2,340 mm | Contractor | £275 | SHOW27_B1_RevA.pdf | Art in progress |
| B2 | E2 | Side wall, behind the screen | Agreed blank, the kit's white panel | No print | Screen fixing only | No print | None | Waiting for screen size |
| B3 | E2 | Side wall, front, two shelves | Inlay | Template, seen 923 × 2,340 mm | Contractor | £275 | SHOW27_B3_RevA.pdf | Art in progress |
| C1 | P1 | Front corner | Printed counter | Contractor's spec sheet | Delivered built | £360 | SHOW27_C1_RevA.pdf | Organiser approval asked |
| N1 | P1 | Fascia, 5 m front | Name panel | Set by the kit | Part of the shell | In the package | None | Name on the form |
| N2 | P1 | Fascia, 3 m side | Name panel | Set by the kit | Part of the shell | In the package | None | Name on the form |
Write one line per panel, even when five panels carry one picture. A printer prints and packs panels, not pictures. If A3 arrives damaged, you reprint A3, not the whole wall.
Now add it up. The overlay is five lines at £300, so £1,500. The two inlays, B1 and B3, are 2 × £275, so £550. The counter is £360. That is £2,410 before VAT, plus the screen fixing. UK VAT at 20% adds £482 (UK VAT rates), so £2,892 in all.
Name each file with the show, the code and the revision letter, such as SHOW27_B1_RevA.pdf. If a printer finds two files for B1, it prints the higher letter. Then a file called final_v3 never reaches the wall.
Which walls stay blank, and what about the fascia?
Some surfaces are not yours to print, and the schedule should say so.
B2 sits behind the screen. Art there is art that nobody sees. So mark B2 as an agreed blank. The brochure says shell walls are usually white PVC, so B2 stays the kit's own white panel. Ask the contractor if the screen fixing needs an inlay panel there instead. If it does, order a plain one and change the line.
A blank panel still gets its own line. Then the printer stops waiting for a file, and the fitters know nothing is missing.
The contractor's 2025 brochure names two items that need the organiser's approval first. They are a fascia overlay and a printed counter. Send both requests on day one. Then ask the organiser five things from your show's stand rules.
- Can the name panels come off?
- Can you print on the fascia?
- How tall may a free standing graphic be?
- How far back must a graphic that faces a neighbour sit?
- Must every wall that faces an aisle be dressed?
Each answer can turn a line blank, or turn a blank line into an order.
The name panels cause the most calls on site. The brochure lists them with the orders to place first. So write the exact name on N1 and N2, spelled the way it must print, with one person to sign it off.
When is the graphics deadline?
The artwork date is the graphics deadline, but the order date is the one that bites. Your show's graphics order form gives three dates. They are the early bird order date, the last order date and the artwork date.
The brochures give the size you see, not the print size. The print size comes on the contractor's template for your show. Ask when it arrives, and fit the final art to it. Settle the walls before you order. The order fixes the products and the counts, and you order from the schedule.
Here is the whole round for this stand. Every date is a sample, with round gaps.
- 1 March. Draw the stand. Put the poles and every code on the elevations. Ask where the front post goes.
- 6 April. The client signs off the schedule, line by line. The walls freeze here, two weeks before the order.
- 20 April. Order at the early bird price, eight weeks out. Send the requests for the fascia and the counter. Order the screen's socket on the electrical form too.
- When the template arrives. Fit the final art. Send one PDF proof per line, with its revision letter.
- 14 May. The client signs off the proofs. Only words can change now.
- 18 May. Send print ready PDFs at the template's size, four weeks out.
- 14 June. Walk the stand with the schedule. Tick each code as it goes up, and take a photo of each wall.
Miss the early bird date, and the same order costs more. Ask for your show's real figure before you set the budget.
The revision is the work explains why the walls freeze before the words.
What goes wrong on site, and how the schedule catches it
Each fault below turns up at the shell. Each one has a line that stops it.
A panel arrives short, because it was sized for another show's kit. The size column names the template and its date, so nobody borrows last year's sizes.
A headline breaks across a join. The poles are on the elevation, so you see it at the proof, not on the stand.
The counter and the back wall come out as two blues. They are printed on different stock. Ask for a printed proof of the main colour on each product. Judge it under bright light, not on a screen.
The best picture hides behind the screen. The B2 line says agreed blank, so nobody spends art there.
On a space only stand, the stand builder's own panel sizes replace the kit's. The same table still works. For the rest of the handover, see what your stand builder needs.
Go back to build up day. This time the poles were on the elevations from the first sketch. The logo sat whole inside one panel. The headline cleared every join. B2 stayed white behind the screen, and the fitters hung A1 to A5 in order from sheet E1. The client walked onto the stand they signed.
Lay out the stand to scale in Monet, then use the drafting sheets, with dimensions, for each wall. Mark every panel code on the plan with 2D markup, pin comments where a line is still open, and export the sheets as PDF for the printer and the fitters. Get started for free on Monet.