
How to Brand a Shell Scheme Stand

To brand a shell scheme stand, size every print to the kit, not the plot. Cut a wall print for each 950 mm panel and keep words 50 mm in from the uprights. Print the fascia, put the logo on the counter's flat front, and set one or two 850 mm roll ups at the front corners. Then light it. Hang a banner only if the show allows it.
The client sent their brand book. The organiser sent a white box, 3 by 3 m.
You want that box to look like the brand, and like the render the client said yes to. The kit fights you. It is nine white panels with a metal upright between each one. The name board shows what is on the contract, not your logo. You may not drill or screw into a panel. A print sized to the plot does not fit, and a 3 m pop up wall does not even go in.
So brand a shell scheme stand with kit sized to the kit. Cut a wall print for each panel. Print the fascia. Wrap the counter. Stand one or two roll ups at the front. Then light it, so it all shows. A hanging banner comes last, and only if the show says yes.
Every size here is real. The shell is a sample kit, sized from the data sheet of a standard modular panel system. The roll ups, the counter, the frames and the banners come from one maker's spec sheets and print templates. Your show's kit and your printer's sheets may differ by a few millimetres. Check them before you send files.
What can you brand on a shell scheme stand?
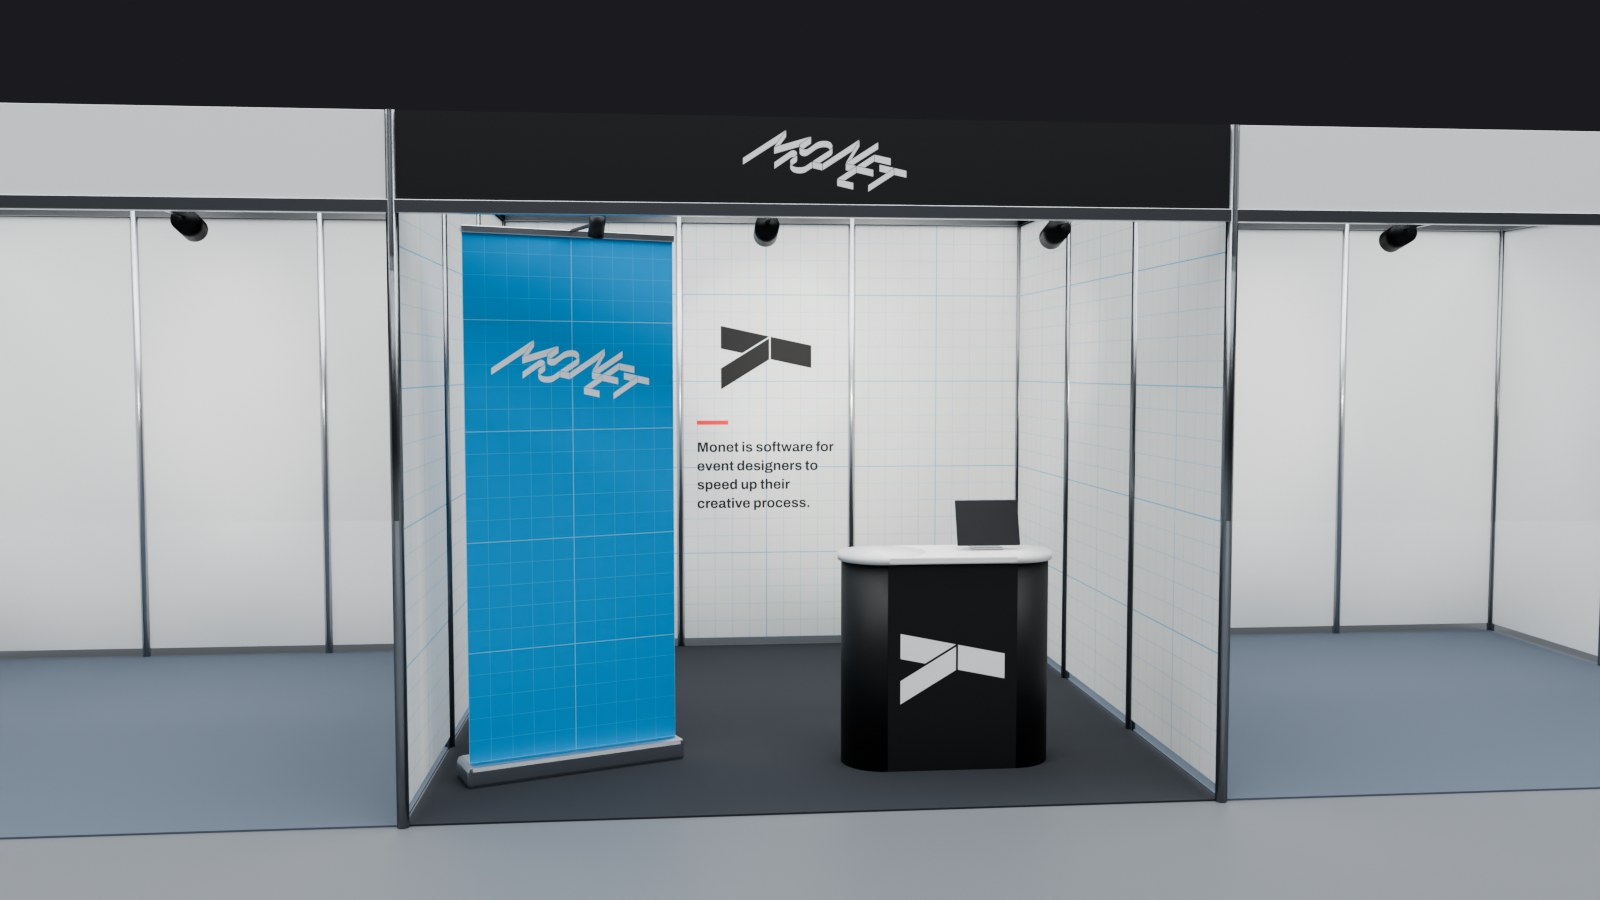
A 3 by 3 metre shell scheme stand branded as Monet, with the wordmark on the fascia, a blue roll up banner, a grid wall with the logo and the core message, and a black counter with the submark
Look at the stand above. It uses five things and nothing else. One dark colour runs across the walls. One red mark sits in the middle of the back wall, inside one panel. The side wall carries big curves that cross the joins, because flat shapes survive an upright and words do not. The roll up and the counter repeat the mark at the front, where the aisle sees them first.
That is the whole method. Pick one colour, one mark and one line of words. Put the mark where nothing cuts it. Then repeat it at the front.
Here is what fits on a 3 by 3 m inline stand, at real sizes.
| Item | What you see | Your print file | Where it goes |
|---|---|---|---|
| Wall print | 950 by 2,380 mm, on 9 panels | 964 by 2,394 mm for a whole panel, 950 by 2,380 mm for a face print | Back and side walls |
| Fascia print | 2,970 by 300 mm in the sample kit | The size the organiser gives you | The board over the open side |
| Counter wrap | A counter 850 mm wide, 865 mm high and 330 mm deep | One sleeve, 1,530 by 876 mm | A front corner |
| Roll up | 850 by 2,030 mm | 850 by 2,180 mm, with 150 mm at the foot | One or two at the front |
| Hanging banner | 1.5 m across or more | Set by its shape and size | Over the stand, only if allowed |
People give a stand about three seconds as they walk past. What makes people stop at a booth is mostly one clear thing they can see from the aisle. On a shell, that thing is your back wall and your front corner.
How big are shell scheme wall graphics?
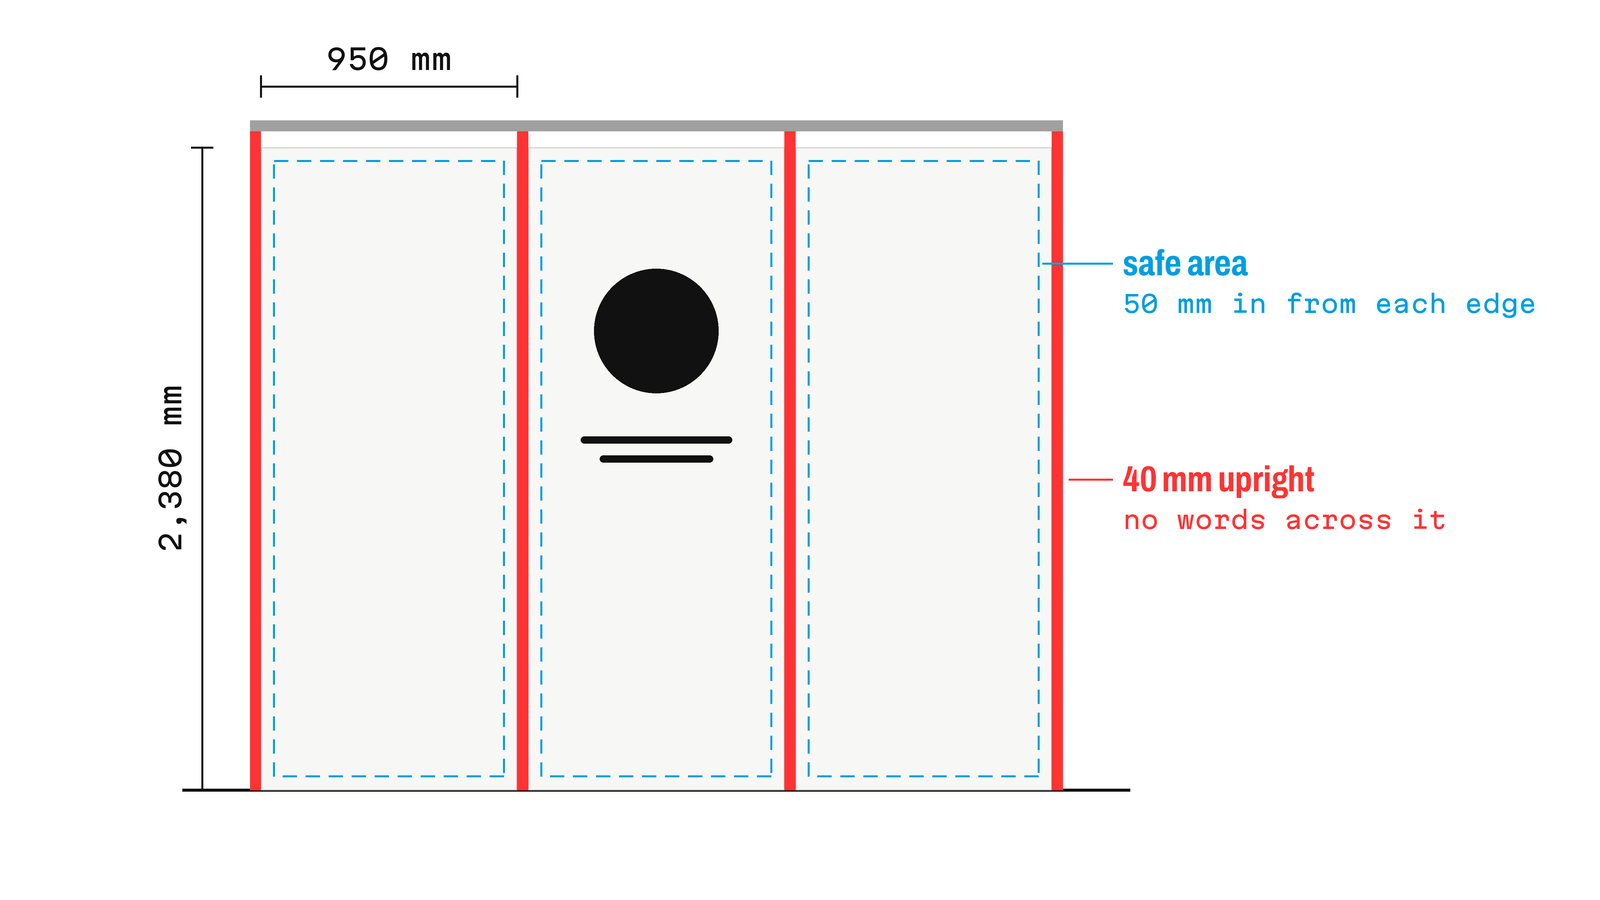
A shell scheme back wall of three 950 by 2,380 mm panels with red 40 mm uprights and a blue safe area 50 mm inside each panel
Each wall is three panels. In the sample kit each panel shows 950 by 2,380 mm. A 40 mm upright stands between each pair, about 18 mm proud of the face. It throws a line of shadow right down your art.
So a 3 m wall is never one print. It is three prints of 950 mm, with metal lines between them. Words that cross a line get cut in two. A face that crosses one looks broken.
How the print goes on sets the file size. Ask the shell contractor which way they do it.
- A printed panel slides into the frame in place of the white one. The panel is 964 by 2,394 mm, and 7 mm of each edge hides in the groove. Make the file 964 by 2,394 mm.
- A vinyl print sticks to the face of the white panel. Make it 950 by 2,380 mm, plus the bleed the printer asks for.
Then set a safe area. Keep every word and logo at least 50 mm in from each panel edge. That leaves 850 by 2,280 mm per panel for words. Flat colour, photos and big shapes can run edge to edge and cross the joins. Words stay inside one panel.
Put the main mark and the one line of words high, between about 1.5 and 2.3 m. Heads in the aisle hide anything lower. Letters you want read from 3 m away need to be about 8 cm tall. Where visitors really look shows why height wins.
Give each panel a name so the printer can't swap them. Call the back B1 to B3, left to right. Call the sides L1 to L3 and R1 to R3, back to front. A graphics schedule template keeps the nine files on one sheet.
Can you print the fascia name board?
The fascia is the board over the open side. In most packages it shows your name in plain vinyl letters, with your stand number. It shows the name on your contract unless you send something else. So send the exact words by the organiser's date.
Many shows let you order more for a fee. That can be your logo on the board, or a full print. Ask the organiser three things. How big is the board? Is a logo or a full print allowed? And who prints it, the official contractor or your own printer?
In the sample kit the board is 300 mm deep. Keep 50 mm clear at the top and the bottom, and your letters can be 200 mm tall. That reads from about 7 m down the aisle. So keep the line short. A logo and a name fit. A slogan does not.
A corner stand has two open sides, so it gets two fascia boards. Put the same logo on both.
How to wrap the counter
The counter is the one thing on the stand that faces the aisle square on. Brand it like a sign.
Many packages come with a plain counter. Ask the contractor if you can order a print for its front, and get its exact size.
Or bring a curved pop up counter, like the one in the picture. It is 850 mm wide, 865 mm high and 330 mm deep. Its print is one fabric sleeve, 1,530 by 876 mm. The sleeve wraps the front and both round ends, and it holds on with hook and loop strips.
Only the front is flat. The front face is 848 mm wide, and each round end takes 340 mm. Put the logo and the words on the front face, inside the printer's safe zone. Let the ends carry flat colour, because art on a curve bends out of sight.
Set the counter at a front corner. Then it does not block the way in, and people can still reach the back wall.
Where should the roll up banners go?
A roll up puts your brand right at the front edge. Your walls are seen from in front. A roll up at a front corner, turned a little to the aisle, is seen by people still walking towards you.
The usual size is an 850 mm roll up. It shows 850 by 2,030 mm. The print file is 150 mm taller, at 850 by 2,180 mm, because the foot stays rolled up inside the base. Keep words well clear of the bottom of the file. Roll ups also come 600, 900, 1,200 and 1,500 mm wide.
Watch the height under the fascia. In the sample kit the board hangs from 2,480 mm down to 2,180 mm. Some roll ups stretch up to 2,340 mm. Set one that tall near the front, and it hits the board. The 2,030 mm roll up clears it.
One roll up at a front corner is enough on a 3 m stand. Two, one each side, frame the open front. Don't stand them against a printed wall. They hide the wall you paid to print.
Skip the 3 m fabric pop up wall. It is 3,000 mm wide, and the inside of a 3 m shell is about 2,930 mm between the uprights. It does not go in. A 2,260 mm wide one fits. But it stands 2,260 mm high and eats 305 mm of your floor, just to cover walls you could print. Use one only if the panels can't take prints.
Can you hang a banner over a shell scheme?
Mostly no, so ask before you design one. A hanging banner hangs from the hall roof, not from the shell. The venue's rigging team puts in the points and hangs it, and you order that through the exhibitor manual. Many shows allow hanging signs only over larger space only stands. Check the rule for your stand size.
If the answer is yes, here is what you can pick. Hanging banners come as a circle, a square, a triangle, a wave, an oval or a pinwheel. Some circles, squares and triangles taper. They run from 1.5 m across up to 6 m, and from 610 to 1,830 mm tall. Over a 3 by 3 m stand, a 1.5 m circle or square stays inside your plot.
The print is a fabric sleeve with a zip. A circle 2.4 m across takes a print about 7.65 m long and 915 mm tall, in one piece round the frame. Its template adds 50 mm of bleed at the top and the bottom. The two ends meet at the zip, and art across that seam may not line up. So put a copy of the logo on each side, well away from the zip.
How to light a branded shell scheme
A dark print with no light on it looks black. Light is what makes your colour read.
Most packages give you spots on arms from the fascia beam. The sample kit has two. Ask the contractor to aim them at the back wall, not at the floor. If a spot sits right behind a roll up, ask to slide it along the beam. If you don't, the top of the roll up gets a hot spot and the wall gets none.
Then add light where the package has none.
- One extra spot on the main mark on the back wall.
- A clamp light on top of each roll up. The usual LED one draws about 35 W. Check it runs on the hall's power, since some are sold for 110 V.
- A lightbox frame for one glowing picture. Its fabric print has 25 mm of bleed on every side. Sizes run from 560 by 710 mm up to 810 by 1,015 mm.
Every light needs a socket. In most packages the socket goes where the contractor puts it, often at the back. So put the lightbox on the wall with the socket, and mark both on your stand plan. How to light a stand covers the fittings and the beam angles.
Send every file at once
Brand items come from three places. The shell contractor prints the panels. The organiser handles the fascia. Your own printer makes the roll ups, the counter sleeve and any frames. Each has its own form and its own date.
So draw each wall before you design the art. An elevation drawing of the back and side walls shows the client where every upright falls. It also shows the fascia, the socket and the roll ups at true size. Get the client's yes on that, then make the files.
Then picture build day. The shell goes up. The uprights fall between your words, not through them. The roll up clears the fascia, and the spots land on the wall. The stand the client signed is the stand they walk into.
Set your 3 by 3 m stand on the hall plan to scale. Make drafting sheets of each wall with dimensions, so the client sees where every upright falls before they sign. Mark the socket and the lightbox with 2D markup, pin comments on each print, and export the sheets as PDF. Get started for free on Monet.