
What Changes When Your Peninsula Booth Becomes an Island

A peninsula booth backs onto other booths and keeps one wall. An island has four open sides and no wall. When a peninsula becomes an island, the closet turns into a core with every face on show, the big graphic splits over the core and the sign, the sign moves to the centre, and visitors can walk in from every side. Draw both versions before the client picks.
The client liked your peninsula booth. Then the show offered them an island, and they said yes.
Now the back wall is gone. That wall held the closet, the big graphic, the screen and every cable. On an island, each one needs a new home. And the show's rules for the two types are not the same.
You want the client's yes on a booth that still builds as drawn. What stands in your way is the render they already love. It was drawn for one wall. Slide it into the middle of four aisles, and it breaks in new places. Then the plan comes back from the show, and you repeat the whole process again.
So treat the island as a new design, not the old one with a wall taken off. Take one booth, 20 by 20 ft, or 400 sq ft. Draw it twice, once as each type. The rules below are the typical North American ones, from the IAEE display guidelines most US shows build on. Your show's exhibitor services manual has the final word.
What changes when a peninsula booth loses its back wall?
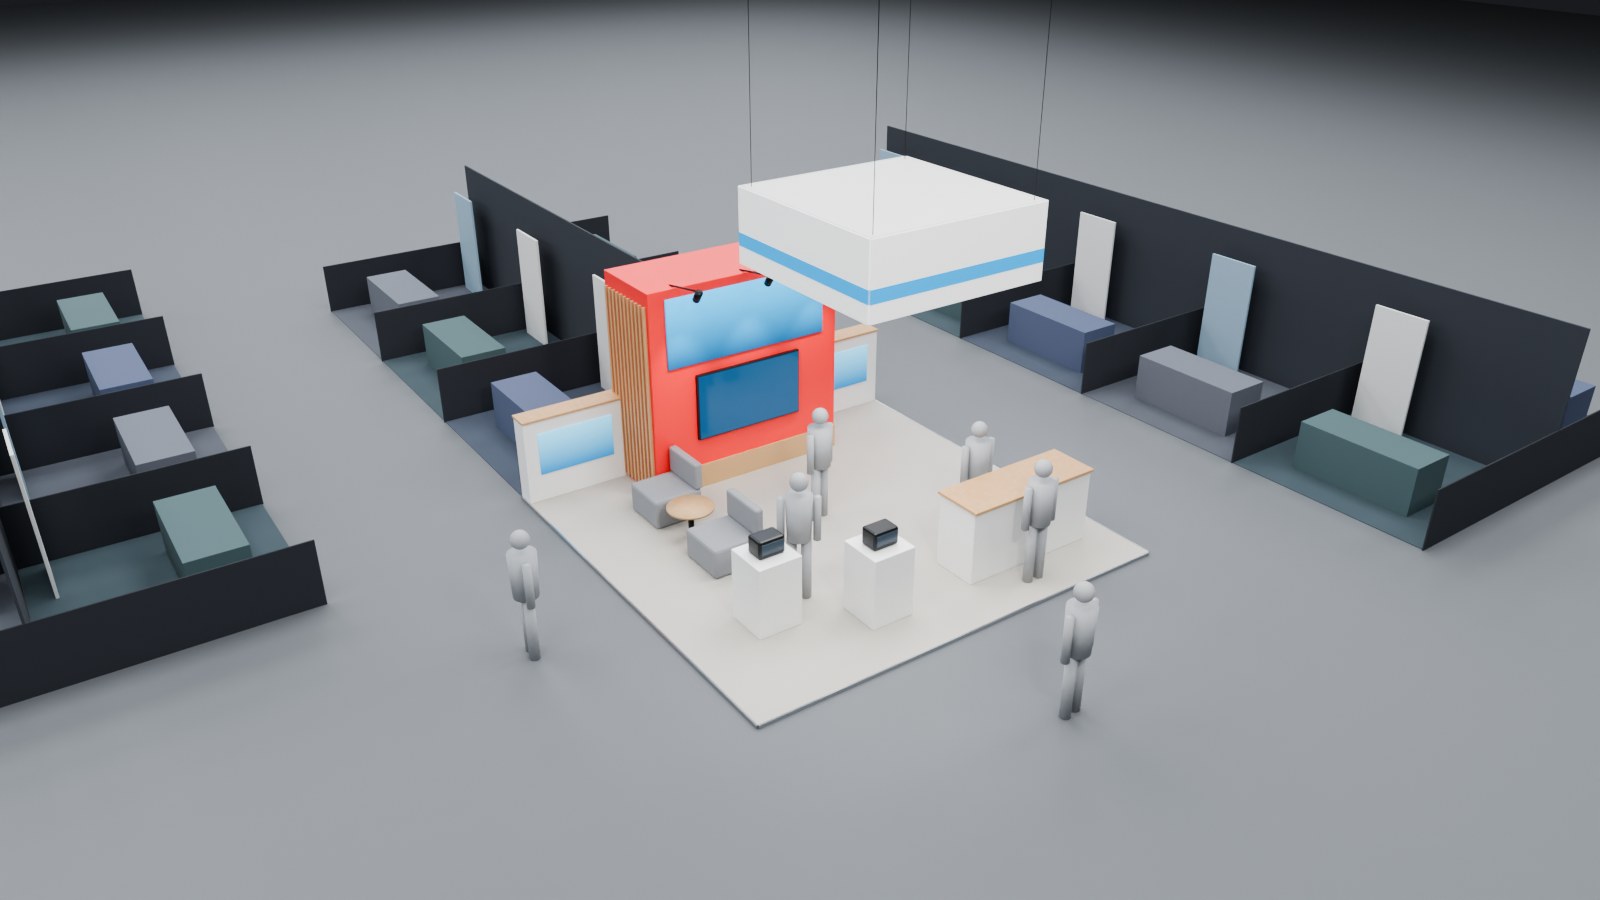
A 20 by 20 ft peninsula booth backed onto two rows of linear booths, its red closet forming the tall middle of the back wall with low ends, and the hanging sign over the front half
A peninsula booth has aisles on three sides and backs onto other booths. Most often those are two rows of linear booths. An island has aisles on all four sides. That one wall changes six things in your design.
| What you design | Peninsula | Island |
|---|---|---|
| Open sides | 3 | 4 |
| Tall build | Middle 10 ft of the back wall only | Anywhere, up to the show's height limit |
| Closet | Built into the back wall, one face shows | Stands in the open, every face shows |
| Big graphic | One back wall, seen from the front | Split over the core and the sign |
| Hanging sign | At least 10 ft from the booths behind | Centred, seen from all sides |
| Power | Brought to the back wall | Comes up where your plan shows it |
| Ways in | Front and two sides | All four sides |
Read the table as a list of redraws. Each row is a part of the render that moves. The sections below take them one by one, on the same 20 by 20 ft booth.
Where does the closet go on an island booth?
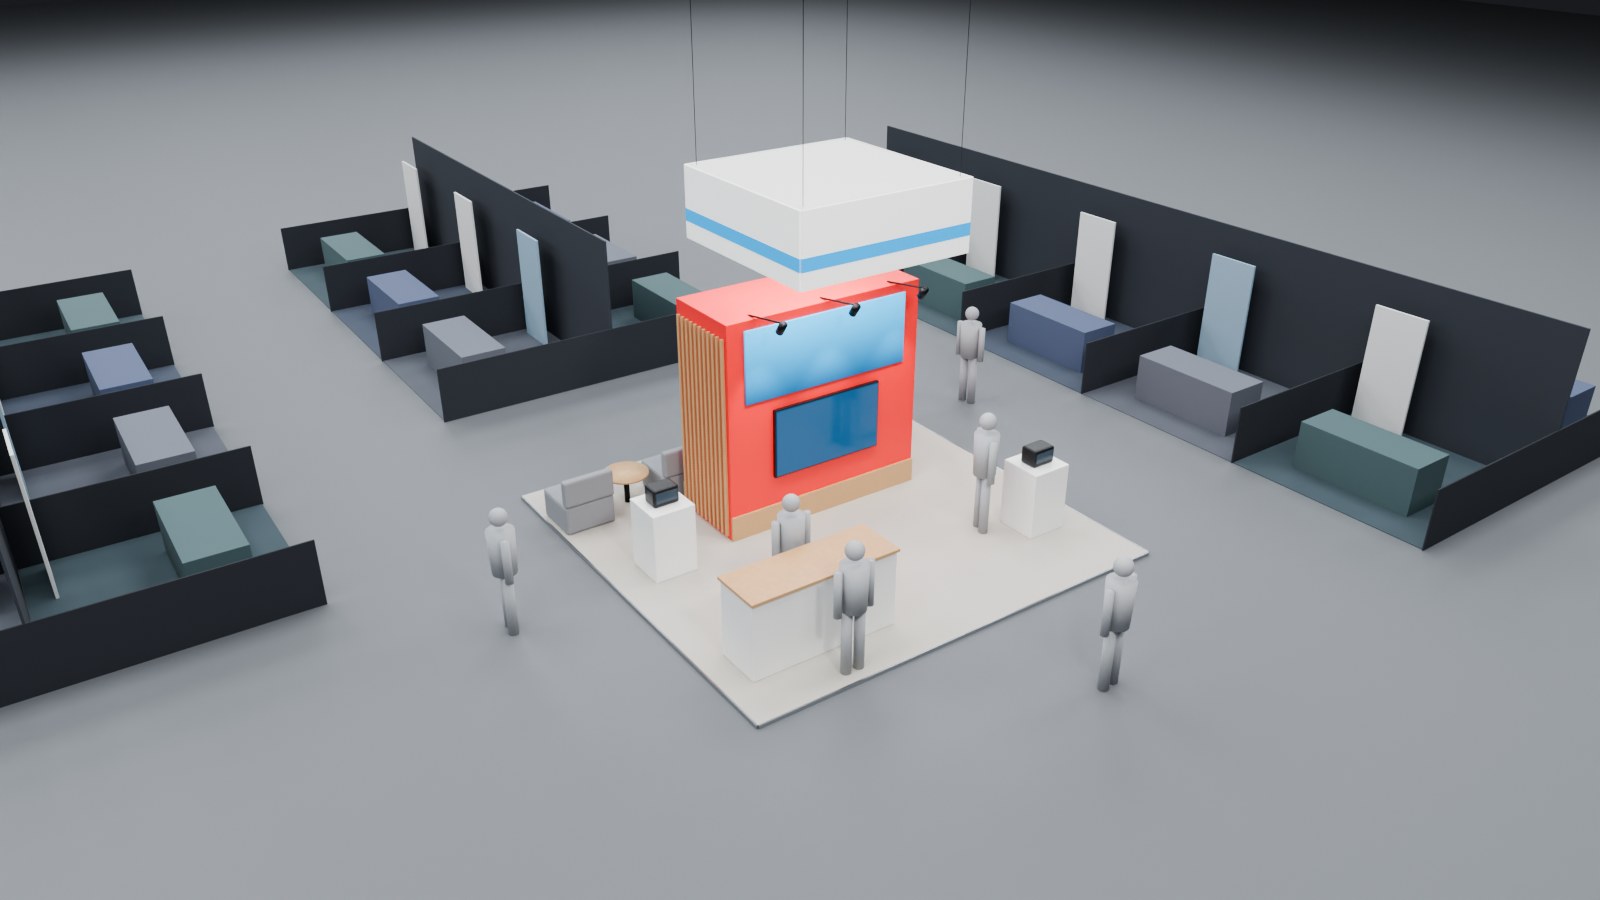
The same booth as an island with aisles on all sides, the red closet now a core with prints on both long faces, the counter on the front aisle and the sign centred above
On the peninsula, the closet hides in the back wall. Say it is 10 by 4 ft, so 40 sq ft. It sits in the middle of the back line. Only its front face shows, and that face is your graphic wall. Its back faces the booths behind you, where nobody stands.
You can't skip the closet and stack boxes out of sight. Fire rules in most halls ban storing product, literature or empty crates behind back drapes. So the closet is a real room on your floor plan, with a door.
On the island, that same closet stands in the open. All four faces show. Count the face you now have to finish.
- Peninsula, front face only. 10 ft.
- Island, all four faces. 10 + 10 + 4 + 4 = 28 ft.
That is almost three times the finished face, from the same 40 sq ft box. So don't hide it. Make it the core of the island. One block holds the closet, the screen, the backlit print and the cables. It also carries the lights.
Then place the core with care. Dead centre feels fair, but it cuts the booth into four thin strips. Push it about 3 ft toward the quietest aisle. Now the main aisle side gets a deep open floor, and that is where people stop. Put the closet door on a short side, facing away from the main aisle.
The core also hides the power. At many shows, the official electrical contractor brings a peninsula's power to the back of the booth. An island has no back. So your floor plan must show where each outlet comes up, before the carpet goes down. Run every cable up inside the core. To find the floor boxes on the hall drawing, read how to read a venue floor plan.
What happens to the back wall graphic?
On a peninsula, the back wall is the one big graphic people see from the aisle in front. Most first sketches run it the full 20 ft. Most shows won't let you.
When a peninsula backs onto linear booths, the back wall stays 4 ft high within 5 ft of each side aisle. Only the middle 10 ft may go tall, often to 16 or 20 ft. So the hero wall is half as wide as the sketch. Plan it that way from the start. Put the tall print and the screen in the middle 10 ft. Use the two 5 ft ends for low shelves or a counter.
The wall has a back, too. It towers over the booths behind you. Many shows ask you to finish that side, because your neighbours look at it. Signs and logos that show on both sides must sit 10 ft back from a neighbouring booth. So design one face, and keep the back clean.
On the island, there is no back wall to print. The big graphic splits up. One print goes on each long face of the core, and the hanging sign carries the name up high. Treat the print that faces the back aisle as a front. People walking that aisle see it first.
List every face, its size and its aisle in a graphics schedule. An island has more faces than a peninsula, and each one has to be sized, printed and lit. For where eyes land on each face, see how to place booth graphics where visitors look.
How do sight lines change from peninsula to island?
The 4 ft rule on a peninsula is about sight lines. It protects the linear booths behind you. A visitor walking up a side aisle must see past your corners into those booths. So keep everything near the side aisles low. A counter at about 42 in is fine.
Your own sight lines are simple on a peninsula. From the front aisle, people see the whole booth against one wall. Everything faces the same way, like a stage.
An island has no wall to stand against. Anything tall blocks someone. Your core hides half the booth from whoever walks the far aisle. So keep the core's long side along the main aisle, and keep the rest low. Then people can see over the counters and across the floor to the core.
Your island blocks the booths behind it, too. That is why the IAEE model says islands should not be sold under 400 sq ft. Smaller ones frustrate everyone behind them. So 20 by 20 ft is about the smallest island you will be offered.
Where can the hanging sign hang?
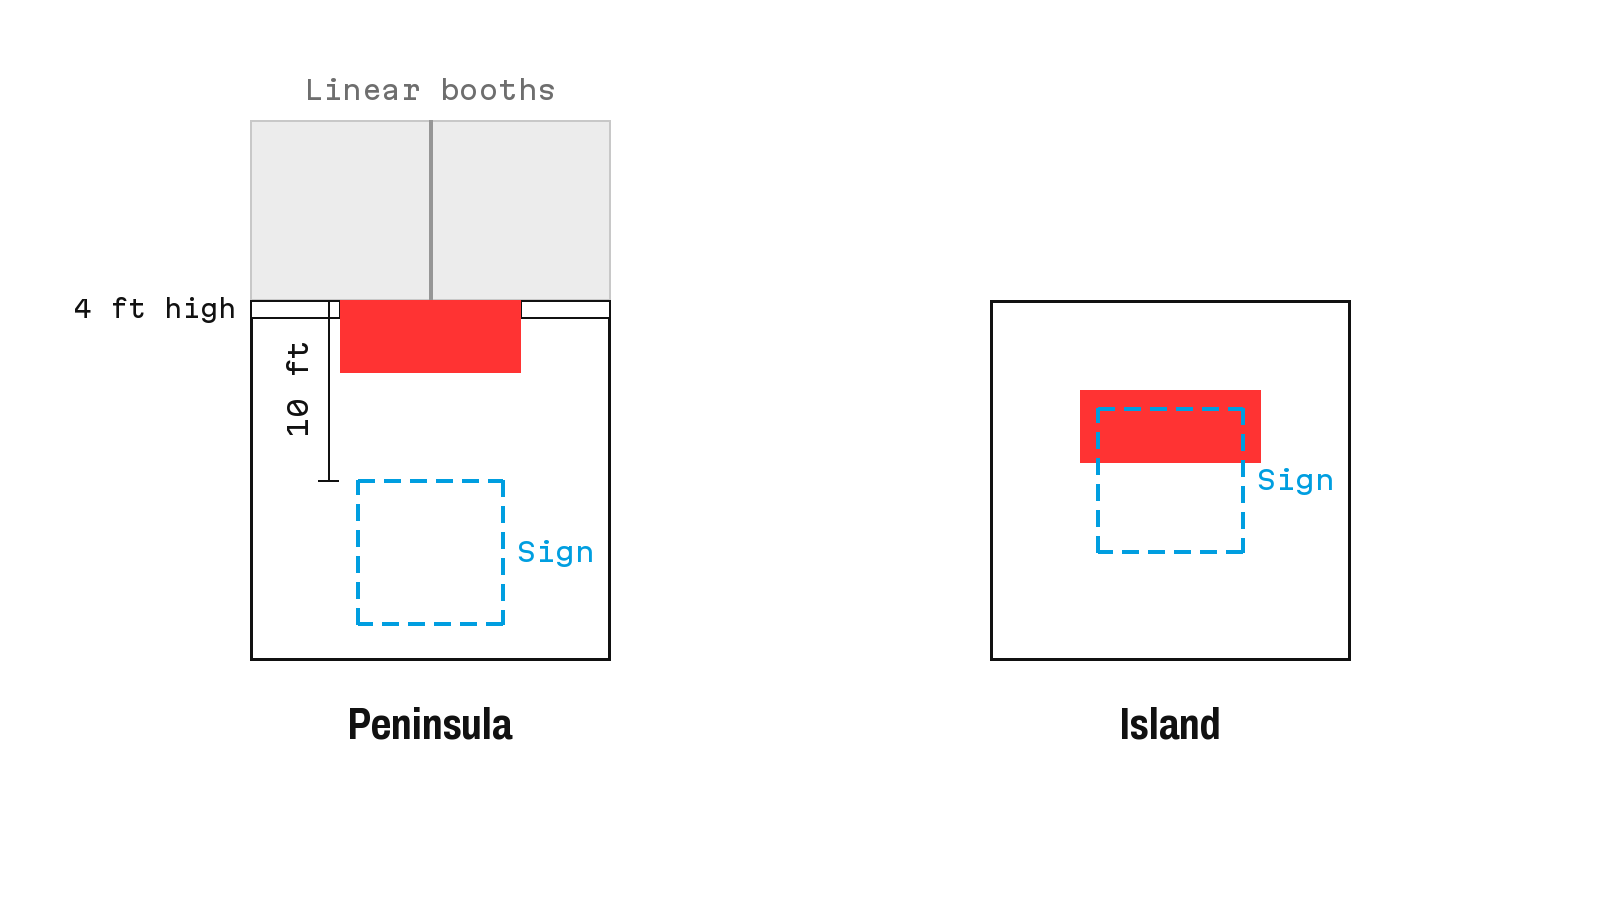
Plans of the same booth side by side, the peninsula with its closet in the middle of the back line, 4 ft high ends and the sign 10 ft from the linear booths, the island with the closet as a core and the sign centred
Most shows allow a hanging sign over peninsula and island booths. The usual top height is 16 to 20 ft, measured from the floor to the top of the sign. It must hang right over your own space. And it must sit 10 ft back from neighbouring booths.
That last rule moves the sign on a peninsula. The linear booths are right behind your back line. So the sign's back edge must be at least 10 ft from it. On a booth 20 ft deep, that is the front half. An 8 ft square sign fits between 10 and 18 ft from the back line. The first sketch often hung it over the back wall. Now it hangs over the open floor.
So check the view from the front aisle. A sign in the front half can block the top of your back wall graphic. Keep the sign's bottom edge above the top of the wall, or lower the print.
On the island, nothing is near enough to push the sign around. Centre it. It is now seen from four aisles, so it needs the name on all four faces, or a round sign.
Two dates come with any sign. The organizer wants to approve it at least 60 days before it goes up. The show also wants a rigging drawing with the load on each hanging point, in DWG, often about three weeks before move in. Draw the sign on an elevation drawing, with its height to the top, so the approval has a number to check.
How do visitors walk into each booth?
A peninsula has three open sides but one front. Most people come in from the aisle in front and walk toward the wall. The side aisles bring people too, so keep each side open where it meets the front. Put the welcome counter near a front corner on the busier side. A counter across the whole front shuts the booth. Put the lounge or meeting seats at the back, beside the closet, where it is quiet.
An island has four ways in and no back. People can walk straight through it from one aisle to the next. So give it a front anyway. The side on the busiest aisle gets the counter and the deep open floor. Put one demo spot on each other side, facing out, so every aisle has a reason to step in. The lounge goes behind the core, on the quietest side.
Count your staff, too. At the busy hour, each open side needs someone facing it. A peninsula needs three people. An island needs four. If the client brings three, one side of the island is empty.
If you close parts of an island with walls, check the fire rules. Some halls want openings in a long wall. One example is a 6 ft opening for every 30 ft of wall. The show's manual will say.
Peninsula booth vs island booth, which one fits your brief?
Pick the peninsula when the brief needs walls. Pick the island when people must see the client from every side.
- If the brief has a closed meeting room, a lot of storage and one hero wall, take the peninsula.
- If the product is something people walk around, like a car or a machine, take the island.
- If the client will staff fewer than four people at the busy hour, take the peninsula.
- If the space is under 400 sq ft, an island is rarely on offer, so design the peninsula well.
The island costs more than its floor rent. The closet goes from 10 ft of finished face to 28 ft. The sign needs the name on every face. Power needs a plan before the carpet. Each of these is a line on the quote.
So draw both versions at concept stage. Show the client the two renders side by side, with the plan under them. Then they pick the type once, with you, before the first round of revisions. For more on designing the island itself, see how to design an island stand that works from every side.
Go back to the client who said yes to the island. This time the back wall became a core, and the closet got its door on the quiet side. The print faced the back aisle as well as the front. The sign hung in the middle, named on four sides. The plan came back approved, and the booth went up as drawn.
Upload the hall plan, set its scale and draw your booth on its real plot. Draw it once as a peninsula and once as an island, check each closet and sign with the measure tool, render both for the client and pin comments where they still have to choose. Get started for free on Monet.